DIY Tactical: Building Your AR-15 Upper Receiver from Scratch
How to Build AR 15 Upper Assembly: Top 6 Easy Steps (2024)
Introduction
Building your own AR-15 upper assembly is a rewarding experience. Not only does it give you a deeper understanding of your firearm, but it also allows you to tailor it to your specific needs. In this guide, we’ll walk you through each step to make the process simple and straightforward. Whether you’re a seasoned builder or a first-timer, you’ll find everything you need to know to create a reliable and customized AR-15 upper assembly.
Here are the key steps you’ll follow:
1. Install the barrel.
2. Set up the gas system.
3. Attach the handguard.
4. Fix the muzzle device.
5. Assemble dust cover, charging handle, and BCG.
6. Add the butt stock.
Understanding the importance of a well-constructed upper assembly can’t be overstated. It not only determines the rifle’s reliability and accuracy but also plays a significant role in your shooting experience. Safety, as always, is paramount. Ensure you have a clean, well-lit workspace and follow all standard firearm safety protocols during the build process.

Essential Tools for Building an AR-15 Upper Assembly
Before diving into how to build an AR-15 upper assembly, you need the right tools. Having the proper equipment will make your build smoother and safer. Here’s what you’ll need:
Armorer’s Wrench
An armorer’s wrench is a versatile tool designed specifically for AR-15 builds. It helps with tightening barrel nuts, flash hiders, and buffer tubes. This tool is essential for ensuring that all parts are securely fastened.

Barrel Nut Wrench
Some barrels require a manufacturer-specific barrel nut wrench. This is especially true for proprietary designs like those from Aero Precision. Make sure you have the correct wrench for your barrel nut to avoid damaging it.
Allen Keys and Driver
Allen keys (or hex keys) are required for various screws and bolts, particularly when installing the handguard and other accessories. Having a set of these will make adjustments straightforward.
Anti-Seize Lubricant
When installing the barrel, applying anti-seize lubricant is crucial. This prevents galling and makes future disassembly easier. Look for anti-seize lubricants containing aluminum or copper but avoid those with graphite to prevent galvanic corrosion.
Vise
A sturdy vise is indispensable for holding your upper receiver steady during assembly. It allows you to apply the necessary torque without risking damage to the components.
Barrel Vise Block
A barrel vise block is used to secure the barrel in the vise, ensuring it doesn’t move while you work on it. This tool is particularly useful when tightening the barrel nut.

Additional Tips
- Safety First: Always wear safety glasses and work in a well-lit area.
- Organization: Keep your workspace tidy and parts organized to avoid losing small components like roll pins and springs.
Having these tools on hand will make your AR-15 upper assembly process much smoother and more efficient. Next, let’s dive into the step-by-step guide on how to build an AR-15 upper assembly.
Next up, we’ll discuss Step 1: Installing the Barrel.
How to Build AR 15 Upper Assembly: A Step-by-Step Guide
Step 1: Installing the Barrel
First, we need to install the barrel to the upper receiver. Mil-spec and Aero Precision barrels follow the same basic principle but differ in their locking systems.
- Lubrication: Apply anti-seize lubricant to the barrel extension and the threads of the upper receiver. This prevents corrosion and makes future disassembly easier.
- Barrel Nut: Insert the barrel into the upper receiver. For mil-spec barrels, hand-tighten the barrel nut, then use an armorer’s wrench to finish the job. Aero Precision barrels may require a specific tool for their enhanced locking system.
Step 2: Setting Up the Gas System
Next, we install the gas system, which includes the gas block and gas tube.
- Gas Block: Slide the gas block over the barrel and align it with the gas port.
- Gas Tube: Insert the gas tube into the gas block and secure it using a roll pin. Using an adjustable gas block allows for fine-tuning the gas flow, improving the shooting experience.
Step 3: Attaching the Handguard
Now, it’s time to attach the handguard, which protects your hands from the hot barrel and offers mounting points for accessories.
- M-LOK Rail Systems: Slide the handguard over the barrel and gas system. Secure it using the provided screws.
- Heat Protection: Ensure the handguard is tight and properly aligned to avoid any issues during shooting.
Step 4: Fixing the Muzzle Device
The muzzle device, like the Aero Precision Gamma, helps control recoil and muzzle rise.
- Crush Washer: Place a crush washer over the barrel threads before threading on the muzzle device.
- Orientation: Start threading the muzzle device, making sure it’s oriented correctly. Torque it down using an armorer’s wrench.
Step 5: Assembling Dust Cover, Charging Handle, and BCG
These parts ensure your AR-15 functions correctly and stays clean.
- Dust Cover Installation: Insert the dust cover bar through the upper receiver and the dust cover, securing it with the retaining spring and C-clamp.
- Charging Handle Alignment: Flip the upper receiver upside down and slide the charging handle into its channel.
- Bolt Carrier Group: Drop the bolt carrier group into the receiver, gas key side first, and push both the BCG and charging handle into place.
Step 6: Adding the Butt Stock
Finally, add the butt stock to complete your build.
- Magpul CTR: Squeeze the locking lever and pull the metal pins downwards to slide the stock onto the buffer tube.
- Stock Adjustment: Adjust the stock to your preferred position, ensuring it locks securely into place.
Now that you have assembled your AR-15 upper receiver, you’re one step closer to completing your build. Next, let’s tackle some common challenges and troubleshooting tips.
Common Challenges and Troubleshooting Tips
Building an AR-15 upper receiver can be rewarding, but it comes with its own set of challenges. Here are some common issues you might face and how to troubleshoot them.
Alignment Issues
Problem: Misalignment during assembly can lead to malfunctions.
Solution:
- Ensure Proper Fit: Components should fit snugly without forcing. For example, when installing the barrel, make sure it seats properly into the upper receiver.
- Double-Check Alignment: Verify that the gas block and gas tube are perfectly aligned. Misalignment here can cause cycling issues.
- Use the Right Tools: Proper tools, like an armorer’s wrench and barrel vise block, help maintain correct alignment.
Tight Fittings
Problem: Some parts may fit too tightly, making assembly difficult.
Solution:
- Lubrication: Apply anti-seize lubricant on threads and contact points. This makes it easier to slide parts into place.
- Gentle Tapping: Use a rubber mallet or a soft-faced hammer to gently tap stubborn parts into place. Ensure you’re not forcing them to avoid damage.
- Proper Tools: Using tools like roll pin punches can help you drive pins without damaging the parts.
Gas System Adjustments
Problem: The gas system can be tricky to install and adjust, especially if you’re using an adjustable gas block.
Solution:
- Install Carefully: Attach the gas block to the barrel and secure the gas tube with a roll pin. Use a roll pin punch for best results.
- Adjustable Gas Block: If using an adjustable gas block, fine-tune the gas flow to ensure smooth cycling. An adjustable block allows you to control the gas flow, which can improve shooting comfort and reliability.
- Fixed Gas Block: For a fixed gas block, ensure it’s securely fastened. If you experience cycling issues, you might need to adjust the buffer spring or change the muzzle device.
Additional Tips
- Functionality Tests: After assembly, perform a function check. Ensure the safety selector works correctly, the trigger resets, and the magazine fits properly.
- Headspace Check: Always recommended, although modern parts usually fit well. A “field” gauge can be a good final check to ensure everything is safe.
By addressing these common challenges, you’ll ensure a smoother assembly process and a more reliable AR-15 upper receiver. Now, let’s move on to some frequently asked questions about building an AR-15 upper.
Frequently Asked Questions about Building an AR-15 Upper
What parts are needed for a complete AR-15 Upper?
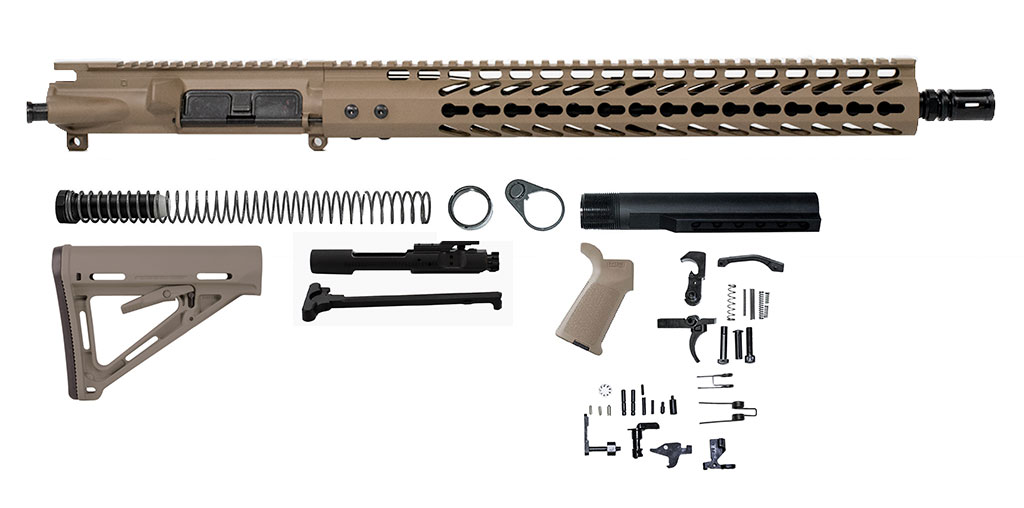
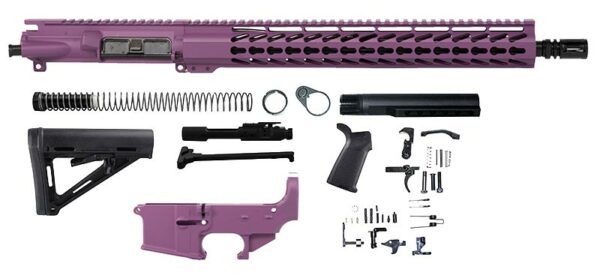
To build a complete AR-15 upper, you’ll need the following parts:
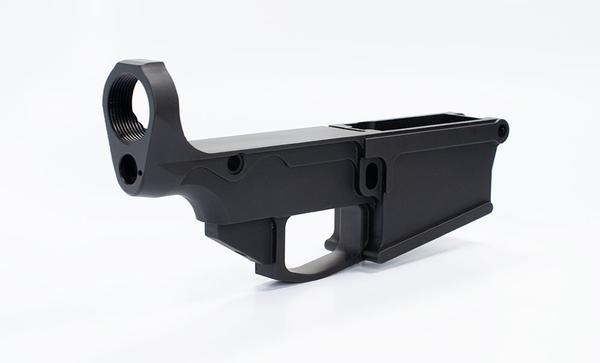
- Upper Receiver: This is the main housing for the barrel, bolt carrier group, and other components. You can opt for a stripped upper receiver or a complete one.
- Bolt Carrier Group (BCG): This includes the bolt, carrier, gas key, and firing pin. It’s crucial for the rifle’s cycling and firing.
- Gas Block and Gas Tube: These parts channel gas from the barrel to the BCG, cycling the action. An adjustable gas block can help fine-tune performance.
- Charging Handle: Used to chamber a round and clear malfunctions. Quality options like the BCM Gunfighter Charging Handle can make a big difference.
- Barrel: The length, profile, and chambering (e.g., .223 Wylde) will affect your rifle’s weight and accuracy.
- Handguard: Protects your hand from the barrel’s heat and provides mounting points for accessories. M-LOK rails are popular for their versatility.
- Muzzle Device: This can be a flash suppressor, compensator, or muzzle brake, each serving different purposes.
- Dust Cover: Keeps debris out of the upper receiver.
- Forward Assist: Helps ensure the bolt is fully closed.
How much does it cost to build an AR Upper?
The cost of building an AR-15 upper can vary widely based on the quality and type of parts you choose. Here’s a rough breakdown:
- Upper Receiver: $80-$150
- Barrel: $150-$250
- Bolt Carrier Group: $100-$360
- Gas Block and Gas Tube: $20-$100
- Charging Handle: $20-$50
- Handguard: $100-$200
- Muzzle Device: $20-$60
- Dust Cover and Forward Assist: $20-$40
Total Cost Range: $500-$1,200
Budgeting Tips:
– Start with Essential Parts: Focus on getting a reliable barrel and BCG first.
– Look for Sales: Many retailers offer discounts on parts bundles.
– Consider Used Parts: Some components can be bought second-hand to save costs.
Do you need special tools to assemble an AR-15?
While basic tools can get you started, specialized tools are recommended for a smooth and precise build. Here are the essentials:
- Armorer’s Wrench: Necessary for tightening barrel nuts, muzzle devices, and other components.
- Barrel Nut Wrench: Some manufacturers require specific wrenches for their barrel nuts.
- Allen Keys and Driver: For installing handguards and other parts.
- Anti-Seize Lubricant: Prevents threads from galling during assembly.
- Vise and Barrel Vise Block: Secure the upper receiver and barrel during installation.
Specialty Tools:
– Torque Wrench: Ensures proper torque settings for barrel nuts and other components.
– Roll Pin Punch Set: Helps in installing pins without damaging them or the receiver.
– Bench Block: Provides a stable surface for driving pins.
Using the right tools not only makes the assembly easier but also ensures that your AR-15 upper is built safely and correctly.
By understanding these key aspects, you can confidently build your AR-15 upper assembly. Ready to get started? Check out our detailed guides and resources for more information.
Conclusion
Building your own AR-15 upper assembly can be a rewarding experience. It allows you to customize your rifle to fit your specific needs and preferences. Let’s review some key points and maintenance tips to ensure your build remains in top condition.
Review
In this guide, we covered the essential steps for how to build an AR-15 upper assembly:
- Installing the Barrel: Ensuring proper torque and alignment.
- Setting Up the Gas System: Choosing the right gas block and tube.
- Attaching the Handguard: Securing it properly for stability and heat protection.
- Fixing the Muzzle Device: Using a crush washer and proper orientation.
- Assembling Dust Cover, Charging Handle, and BCG: Aligning and securing these components.
- Adding the Butt Stock: Finalizing your build with a comfortable, adjustable stock.
Maintenance Tips
Regular maintenance is crucial for the longevity and performance of your AR-15 upper assembly. Here are some tips to keep your rifle in top shape:
- Clean Regularly: After each use, clean the barrel, bolt carrier group, and other components to prevent residue build-up.
- Lubricate: Apply appropriate lubricants to moving parts to ensure smooth operation.
- Inspect: Regularly check for wear and tear, especially on the gas system and bolt carrier group.
- Torque Settings: Periodically recheck torque settings on the barrel nut and other critical components to ensure they remain secure.
- Store Properly: Keep your rifle in a dry, cool place to avoid rust and other environmental damage.
For more detailed guides and to get started on your build, visit our AR-15 Upper Build Assemblies page. We offer a wide range of parts and tools to help you build the perfect AR-15 upper assembly.
Happy building!