Assemble Like a Pro: How to Build an AR-15 Rifle from a Kit
Introduction
How to build an AR-15 rifle kit is a project many firearms enthusiasts find both rewarding and practical. With the right parts and a bit of guidance, you can create a personalized firearm that meets your specific needs.
Here’s a quick overview to get you started:
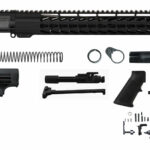
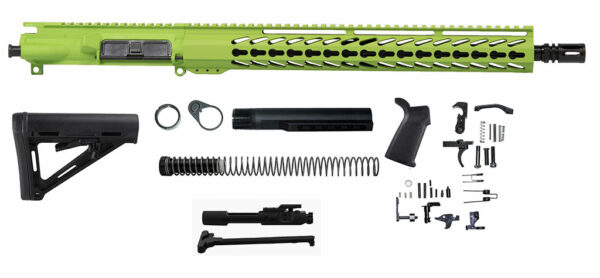
– Gather Tools and Parts: Make sure you have all necessary components and tools.
– Assemble Lower Receiver: Attach trigger, grip, and stock.
– Assemble Upper Receiver: Install barrel, handguard, and bolt carrier group.
– Final Assembly: Connect upper and lower receivers, attach gas system, and test.
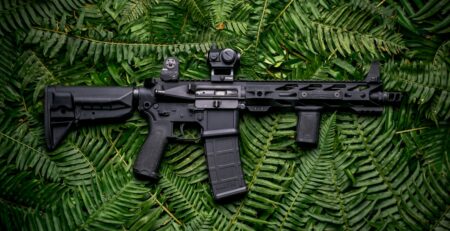
Building an AR-15 rifle offers a unique sense of gratification. It’s more than just assembling a firearm; it’s about tailoring it to fit your style and purpose. Whether for competitive shooting, hunting, or home defense, the customization options are endless. Plus, building your own AR-15 deepens your understanding of how it functions, making you a more knowledgeable and responsible owner.
With our step-by-step guide, you’ll learn to build an AR-15 like a pro, ensuring your rifle is both reliable and precise.

Legal Considerations in Building an AR-15
Building your own AR-15 rifle can be a rewarding project, but it’s essential to stay within the legal boundaries. Here are the key points you need to know about FFL requirements, background checks, and state laws.
FFL Requirements
Federal Firearms License (FFL): If you purchase a stripped lower receiver, you must go through an FFL. This involves filling out paperwork and undergoing a background check. The lower receiver is considered the “firearm” part of your AR-15, making it subject to federal regulations.
However, if you opt for an 80% lower receiver, you can bypass the FFL requirements in most states. An 80% lower receiver is not legally considered a firearm until it is completed, so you can purchase and ship it directly to your home without a background check.
Background Checks
Stripped Lower Receivers: When you buy a stripped lower receiver, you will undergo a background check through the National Instant Criminal Background Check System (NICS). This ensures that you are legally allowed to own a firearm.
80% Lower Receivers: These do not require a background check under federal law. However, some states have stricter regulations. For example, California mandates background checks and serialization for 80% lowers.
State Laws
State laws can vary significantly, and it’s crucial to know the regulations in your area:
- California: Requires background checks and serialization for 80% lowers.
- New York: Has stringent regulations that may affect your ability to build an AR-15.
- New Jersey: Requires registration of homemade firearms.
Always check your local and state laws before starting your build to ensure compliance.
Pro Tip: Ignorance of the law is not an excuse. Always double-check the latest regulations to avoid legal issues.
For more detailed information, you can visit the ATF’s website or consult with a local firearms attorney.
With the legal considerations in mind, you’re now ready to dive into selecting the right parts for your AR-15 kit.
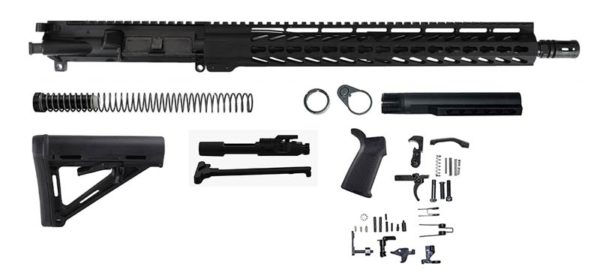
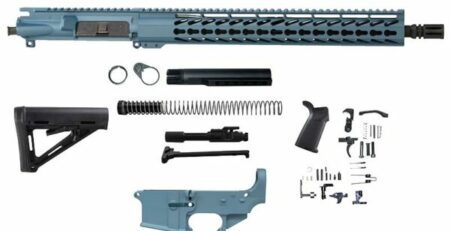
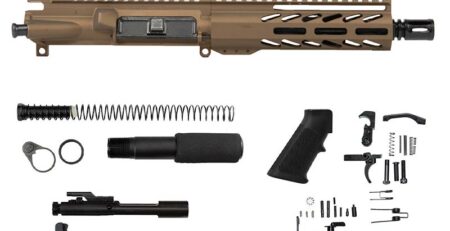
Choosing the Right Parts for Your AR-15 Kit
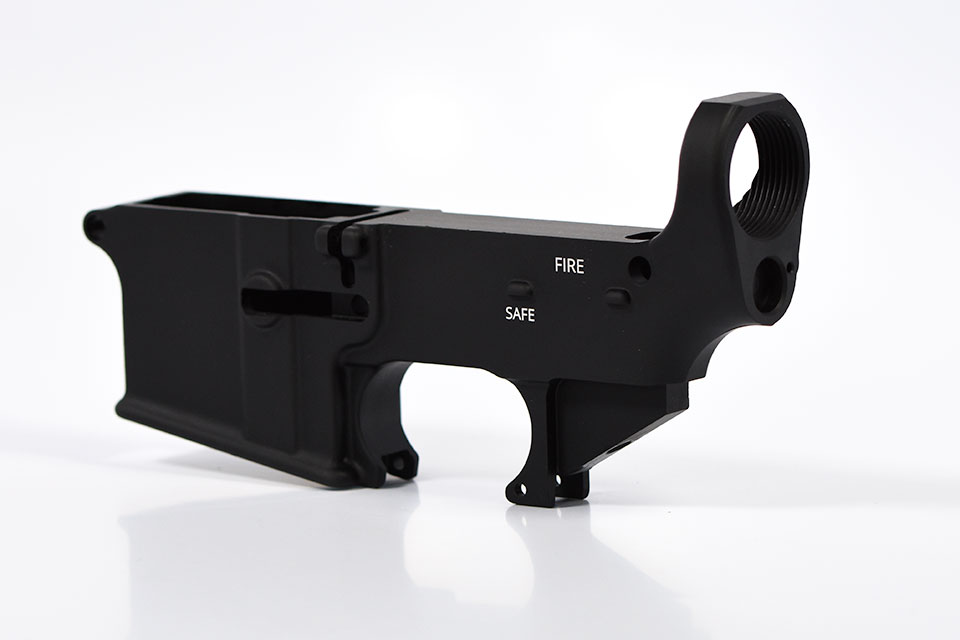
How to Select a Lower Receiver
When it comes to building an AR-15, the lower receiver is your starting point. You have two main options: a stripped lower receiver or an 80% lower receiver.
-
Stripped Lower Receiver: This is the easier route. You buy a completed lower receiver that only needs assembly. However, you’ll need to undergo a background check and possibly wait due to state laws.
-
80% Lower Receiver: This option requires more work since it’s not considered a firearm until you finish machining it. You avoid background checks and waiting periods, but you’ll need some additional tools and skills. For a complete guide on 80% lowers, check out our What is an 80 Lower?.
Regardless of your choice, make sure your lower receiver is serialized if required by your state laws. This can help avoid legal complications down the road.
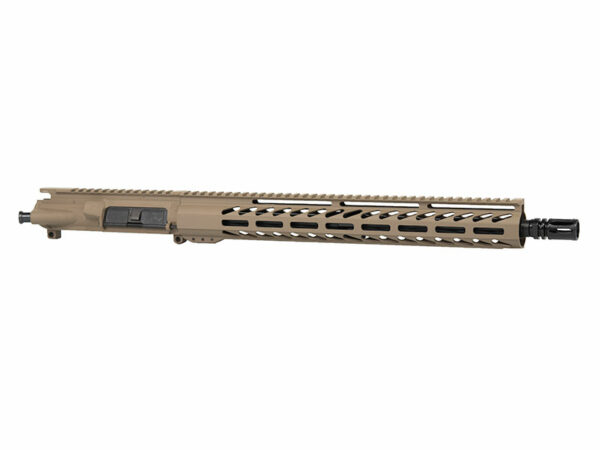
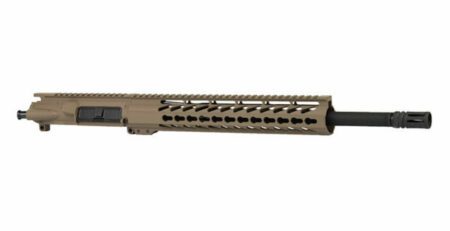
Essential Upper Receiver Components
Now let’s talk about the upper receiver and its critical components, including the barrel, handguard, BCG (Bolt Carrier Group), and charging handle.
Barrel
The barrel is arguably the most important part of your AR-15. It affects accuracy, range, and the type of rounds you can shoot.
-
Material: Most barrels are made from 4140 Chromoly, 4150 CMV, or 416R stainless steel. The 4150 CMV barrels are popular for their balance of durability and cost.
-
Length: For a standard build, a 16″ barrel is optimal. It provides a good balance between velocity and maneuverability. According to our research, a 16″ barrel can achieve around 2,940 FPS with Federal 62-grain 5.56 ammo.
-
Twist Rate: A twist rate of 1:7 or 1:8 is recommended. These can handle the most common 5.56 and .223 loads effectively.
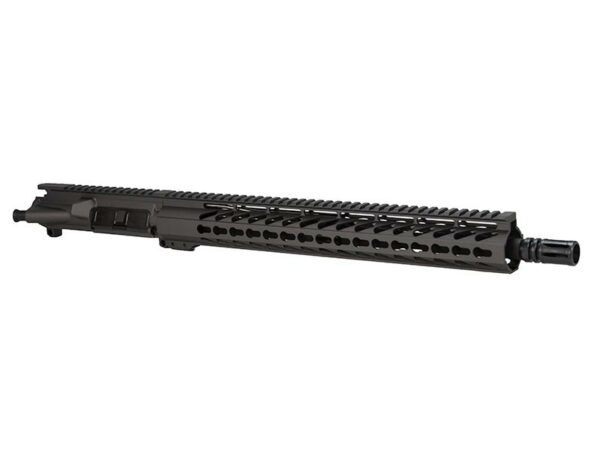
Handguard
The handguard protects your hands from the heat of the barrel and provides a mounting platform for accessories.
-
Free-Float Handguard: This type doesn’t attach to the barrel or gas block, increasing accuracy by reducing stress on the barrel.
-
Drop-In Handguard: Attaches to the gas block/front sight post, offering a more secure fit. This is the type used in military service rifles.
Bolt Carrier Group (BCG)
The BCG is the heart of your AR-15. It contains the bolt, carrier, and firing pin, which are crucial for the rifle’s operation.
-
Material: Look for BCGs made from Carpenter 158 steel or 9310 steel. These materials are durable and reliable.
-
Finish: A chrome-lined or nitride finish can increase the longevity and reliability of your BCG.
Charging Handle
The charging handle allows you to manually cycle the rifle. It’s a simple but essential part.
-
Standard Charging Handle: Works well for most builds.
-
Ambidextrous Charging Handle: Offers more versatility, especially for left-handed shooters.
Selecting a Gas System
The gas system affects how your rifle cycles and feeds ammunition. Most AR-15s use a direct impingement system, where gas is sent through the barrel and back into the upper receiver.
-
Carbine or Mid-Length Gas System: These are ideal for a 16″ barrel and handle 5.56 or .223 cartridges reliably.
-
Rifle and Pistol Gas Systems: These are for more specialized builds, like a 20″ bench rifle or a subsonic AR-15.
By carefully selecting these components, you’ll be well on your way to building a reliable and high-performing AR-15. Up next, we’ll dive into the step-by-step guide on how to assemble your AR-15 rifle kit.
How to Build an AR-15 Rifle Kit
Preparing the Lower Receiver
Step-by-Step Guide
-
Gather Your Tools and Parts: Make sure you have all necessary tools and parts laid out. You’ll need an Armorer’s Wrench, Roll Pin Punch Set, and a good work surface.
-
Install the Lower Parts Kit (LPK):
- Trigger Assembly: Insert the trigger, followed by the trigger pin. Ensure it moves freely.
- Hammer: Place the hammer and secure it with its pin.
- Bolt Catch: Use a roll pin punch to install the bolt catch. A tip: cover the receiver with painter’s tape to avoid scratches.
-
Magazine Catch: Insert the magazine catch into its slot, followed by the spring and button. Tighten until the button is flush with the receiver.
-
Buffer Assembly:
- Buffer Tube: Screw the buffer tube into the lower receiver.
-
Buffer Spring and Buffer: Insert the spring and buffer into the tube.
-
Stock Attachment: Slide the stock onto the buffer tube and secure it according to the manufacturer’s instructions.
Assembling the Upper Receiver
Step-by-Step Guide
- Install the Barrel:
-
Barrel Nut: Slide the barrel into the upper receiver and secure it with the barrel nut. Use the Armorer’s Wrench to tighten it properly.
-
Gas Block and Tube:
- Gas Block: Slide the gas block over the barrel and align it with the gas port.
-
Gas Tube: Insert the gas tube into the gas block. Ensure it’s properly aligned and secure it with a roll pin.
-
Muzzle Device:
- Install Flash Hider or Muzzle Brake: Screw the muzzle device onto the end of the barrel. Use a crush washer to ensure proper alignment.
Tools Needed
- Armorer’s Wrench: Essential for tightening the barrel nut and buffer tube.
- Roll Pin Punch Set: For installing various pins without damaging parts.
- Safety Equipment: Always wear safety glasses and consider a shop apron to protect yourself from flying springs and pins.
Assembly Tips
- Use Proper Lighting: A well-lit workbench helps avoid mistakes.
- Organize Parts: Group parts by assembly step to keep things orderly.
- Take Your Time: Rushing can lead to mistakes and damage. Double-check each step.
By following these steps and using the right tools, you’ll have a solid foundation for your AR-15 build. Next, we’ll discuss how to optimize your AR-15 rifle kit for accuracy and performance.
Optimizing Your AR-15 Rifle Kit
Optimizing your AR-15 build for accuracy, reliability, and performance involves making informed choices about key components. Let’s start with one of the most critical parts: the barrel.
Choosing the Right Barrel
Material
AR-15 barrels typically come in three types of steel: 4140 Chromoly, 4150 Chromoly Vanadium (CMV), and 416R stainless steel. Here’s what you need to know:
- 4140 Chromoly: Budget-friendly and performs well for most shooters.
- 4150 CMV: Matches military specifications and offers a balance of performance and durability.
- 416R Stainless Steel: Known for superior accuracy, ideal for precision shooting.
Length
Barrel length impacts velocity and handling. For a traditional AR-15 chambered in 5.56/.223, a 16-inch barrel is optimal. It provides a velocity of around 2,940 FPS with Federal 62-grain 5.56 ammo. Stretching to a 20-inch barrel only adds about 120 FPS, so a 16-inch barrel is a practical choice for most builds.
Twist Rate
Twist rate refers to the distance the rifling takes to complete one full rotation. Common twist rates for AR-15s are 1:7 and 1:8. These rates are versatile and handle the most common 5.56 and .223 loads (55-, 62-, and 77-grain) effectively.
Selecting a Gas System
The gas system affects how your AR-15 cycles and feeds ammunition. There are four types of gas systems: Rifle, Mid-Length, Carbine, and Pistol.
Carbine and Mid-Length Gas Systems
For most 5.56/.223 builds, a carbine or mid-length gas system is ideal. These systems reliably handle standard ammunition and provide a balance between gas pressure and recoil management.
- Carbine: Shorter gas tube, higher pressure, slightly more recoil.
- Mid-Length: Longer gas tube, lower pressure, smoother recoil.
Rifle and Pistol Gas Systems
These are more specialized:
- Rifle Gas System: Best for longer barrels (18-20 inches) and provides the smoothest recoil.
- Pistol Gas System: Used for short-barreled rifles and AR pistols, often paired with subsonic/suppressed setups.
By carefully selecting the right barrel and gas system, you can significantly enhance your AR-15’s accuracy, reliability, and overall performance. Next, we’ll dive into frequently asked questions about building AR-15 kits.
Frequently Asked Questions about Building AR-15 Kits
Can I build an AR-15 at home?
Yes, you can build an AR-15 at home, but there are some important legal considerations to keep in mind. According to the ATF, it’s legal to build your own AR-15 for personal use without a Federal Firearms License (FFL). However, if you use a stripped lower receiver, you’ll need to go through an FFL, complete paperwork, and pass a background check. Alternatively, if you use an 80% lower receiver, no FFL or background check is required in most states. Always check your local and state laws before starting your build to ensure compliance.
Is it cheaper to build or buy an AR-15?
The cost of building versus buying an AR-15 can vary. Building an AR-15 from a kit allows for customization and can be cost-effective. According to Daytona Tactical, building your own rifle can provide cost savings compared to purchasing a fully assembled firearm. However, costs can add up based on the quality and type of parts you choose. Generally, you can expect to spend between $600 to $750 for a quality build, while buying a complete AR-15 can cost around $400 to $1,000, depending on the manufacturer and features.
What tools do I need to assemble an AR-15 kit?
While some basic tools can suffice, having specialized tools will make the assembly process smoother and more precise. Here’s a list of essential tools you might need:
- Bench Vise: Holds the receiver steady during assembly.
- Torque Wrench: Ensures proper torque settings for barrel nuts and other components.
- Gunsmith’s Wrench: Useful for installing barrel nuts, flash suppressors, and other parts.
- Punch Set: Helps with installing pins and other small components.
- Armorer’s Wrench: A multi-purpose tool for various tasks, including installing the buffer tube.
- Roll Pin Punches and Starters: Make it easier to install roll pins without damaging the parts.
- Small Hammer: For tapping pins into place.
- Screwdrivers: Various sizes and types for different screws.
Using the right tools not only makes the assembly easier but also ensures the quality and reliability of your AR-15 build. For a more detailed guide, check out Daytona Tactical’s FAQ.
Next, let’s review the benefits of building your own AR-15 rifle kit and how Daytona Tactical can help you get started.
Conclusion
Building your own AR-15 rifle kit is a rewarding experience that offers several benefits. Let’s review why you should consider taking on this project and how Daytona Tactical can make the process seamless and enjoyable.
Review
In this guide, we’ve covered everything you need to know about how to build an AR-15 rifle kit. From selecting the right parts and understanding the legal considerations to using the proper tools and following a step-by-step assembly guide, you now have a comprehensive roadmap to create your own customized AR-15.
Benefits of Building
1. Customization: One of the biggest advantages of building your own AR-15 is the ability to customize it to your exact preferences. You can choose the parts that best fit your needs, from the barrel length to the type of handguard.
2. Cost-Effectiveness: Building your own AR-15 can often be more cost-effective than buying a pre-assembled rifle. You can prioritize spending on the components that matter most to you, and possibly save on others.
3. Learning Experience: The process of assembling an AR-15 offers a deeper understanding of how your firearm works. This knowledge can be invaluable for maintenance and troubleshooting in the future.
4. Satisfaction: There’s a unique sense of accomplishment that comes from building something with your own hands. Completing your AR-15 build will give you a rifle that’s not only functional but also a testament to your skills and effort.
Daytona Tactical
Daytona Tactical is your go-to source for all things related to AR-15 rifle kits. From high-quality parts to comprehensive guides, we provide everything you need to build your dream rifle. Our kits are designed to be user-friendly, making the assembly process as smooth as possible.
We offer a wide range of AR-15 build kits, including the popular AR-15 300 Blackout Rifle Build Kits. These kits come with all the components you need, carefully selected to ensure compatibility and performance.
Whether you’re a beginner or an experienced builder, Daytona Tactical has the resources to help you succeed. Our customer support team is always available to answer your questions and provide guidance throughout your build.
Ready to start your AR-15 build? Visit our AR-15 Rifle Build Kits page to explore our selection and get started on your project today.
Building your own AR-15 is more than just assembling parts—it’s about creating a rifle that’s uniquely yours. With Daytona Tactical, you have everything you need to assemble like a pro. Happy building!


Comments (2)
[…] Strength and Weight: 7075-T6 aluminum offers a perfect balance between strength and weight. It is significantly stronger than other aluminum alloys commonly used in firearm manufacturing, such as 6061. Despite its strength, it remains lightweight, making it ideal for a mobile and versatile AR-15 build. […]
[…] Gas Block and Tube: Make sure the gas block is aligned with the gas port and the gas tube is securely pinned. […]
Comments are closed.