How to Complete an 80% AR-15 Lower Receiver, Even if You’ve Never Tried it Before
How to Finish an 80 AR 15 Lower Receiver: 2024 Guide
Introduction
Curious about how to finish an 80 AR 15 lower receiver but don’t know where to begin? You’re not alone. This guide will help you understand the process, even if you’ve never tried it before.
Quick Overview
- Cost: DIY projects are cost-neutral; it’s more about the experience.
- Difficulty: Basic machining skills required.
- Legality: Legal if you can own firearms, but selling requires a license.
- Tools Required: Milling machine or drill press, fixtures, end mills, drills.
Finishing an 80% lower receiver is a satisfying project that allows you to create a custom AR-15. Even though the cost may not be significantly lower than buying a completed receiver, the sense of accomplishment you’ll feel is priceless. Plus, you’ll gain a deeper understanding of how your firearm works.
In terms of legality, an 80% lower receiver is not considered a firearm by the ATF, meaning it requires no serial number and doesn’t need to go through a Federal Firearms License (FFL) for purchases. However, you must ensure compliance with your state laws and regulations.
Starting this project requires basic machine skills and the right tools, but the payoff is a custom-built lower receiver that you crafted yourself. Once you’ve gathered your tools and set up your workspace, you’re ready to dive into the step-by-step process.

Understanding 80% Lower Receivers
Definition
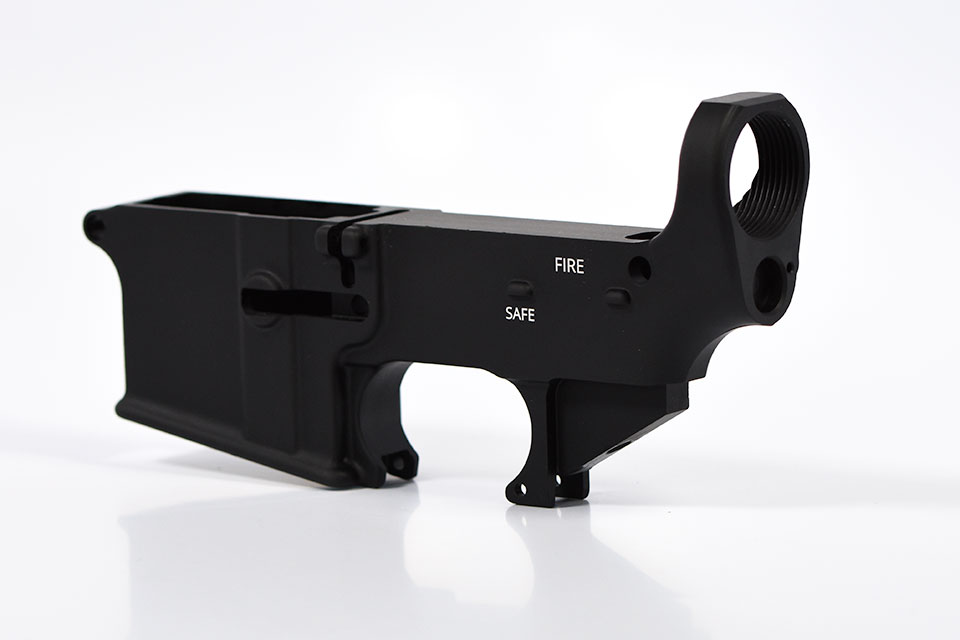
An 80% lower receiver is a partially completed firearm receiver that requires additional machining before it can be used in a firearm. The term “80%” indicates that the receiver is 80% finished, leaving the remaining 20% for the builder to complete. This unfinished state means it is not considered a firearm by the Bureau of Alcohol, Tobacco, Firearms and Explosives (ATF).
Legal Status
Since an 80% lower receiver is not classified as a firearm by the ATF, it does not require a serial number and can be purchased without going through a Federal Firearms License (FFL). You can buy one online and have it shipped directly to your home. However, this changes once you complete the machining process. The finished lower receiver is considered a firearm and must comply with all federal, state, and local laws.
Important: Federal regulations state that you cannot sell a completed lower receiver unless you are a licensed firearms manufacturer. Selling a completed lower without the proper license can lead to serious legal consequences.
Components Missing
An 80% lower receiver lacks several critical features that are necessary for it to function as a firearm. These missing components include:
- Fire Control Group Pocket: The area where the trigger and hammer are housed.
- Trigger Pin Holes: Holes for the pins that hold the trigger and hammer in place.
- Selector Hole: The hole for the safety selector switch.
- Rear Takedown Pin Hole: The hole that allows the upper and lower receivers to pivot open for maintenance.
To complete an 80% lower receiver, you will need to drill and mill these components yourself. The process requires precision to ensure the firearm functions correctly and safely.

By understanding these fundamental aspects, you can better appreciate the steps involved in finishing an 80% lower receiver. Now, let’s look at how to choose the right method for completing your project.
Preparing to Finish Your 80% Lower Receiver
Before you start, it’s crucial to gather the right tools, safety equipment, and set up your workspace properly. This preparation will make the process smoother and help you avoid common mistakes.
Tools Needed
To finish an 80 AR 15 lower receiver, you’ll need several essential tools. Here’s a list to get you started:
- Milling Machine or Drill Press: Crucial for removing excess material.
- Drill Bits and End Mills: Used for drilling holes and finishing the milling process.
- Vise and Clamps: To hold your lower receiver securely in place.
- Measuring Tools: Calipers and rulers ensure precision.
- Jig: Guides your drilling and milling for accuracy.
Safety Equipment
Safety should be your top priority. Here’s what you’ll need to stay safe:
- Safety Glasses: Protect your eyes from metal shavings.
- Gloves: Shield your hands while handling tools and materials.
- Hearing Protection: Power tools can be loud, so protect your ears.
Workspace Setup
A well-organized workspace is vital for a successful project. Follow these tips to set up your area:
- Stable Workbench: Ensure your bench is sturdy and level.
- Good Lighting: Proper lighting helps you see what you’re doing clearly.
- Ventilation: Milling and drilling can produce dust and fumes, so make sure your area is well-ventilated.
- Clean Environment: Keep your workspace tidy to avoid accidents and tool misplacement.
By preparing with the right tools, safety gear, and a proper workspace, you’ll set yourself up for success. Now, let’s move on to choosing the right method for finishing your 80% lower receiver.
How to Finish an 80 AR 15 Lower Receiver: Step-by-Step Guide
Choosing the Right Method
There are several ways to finish an 80% AR-15 lower receiver. The method you choose will depend on the tools you have and your comfort level with them. Here are the most common methods:
CNC Machine
A CNC machine offers precision and automation. It uses computer numerical control to follow a pre-programmed path.
Pros:
– Eliminates human error
– High precision
Cons:
– Requires knowledge of CAD programming
– Not commonly available to most people
Milling Machine
A milling machine can be operated manually or with CAD direction. It’s designed for machining solid materials like metal.
Pros:
– High precision
– Can be learned quickly
Cons:
– Requires a learning curve
– May be intimidating for beginners
Drill Press
A drill press is a pedestal-style drill mounted to a stand. It allows for setting various depths and securely holding your 80% lower receiver.
Pros:
– Simple to use
– Economical
Cons:
– Less precision compared to CNC or milling machines
Router
A router is designed to hollow out areas of solid surfaces. It operates on a single spindle and can be used manually.
Pros:
– Versatile
– Can be used for various materials
Cons:
– Requires manual operation
– Less precise than CNC or milling machines
Hand Drill
A hand drill is the most basic tool for this job. It requires a jig to guide your drilling.
Pros:
– Most accessible
– Simple to use
Cons:
– Least precise
– Time-consuming
Now, let’s dive into the detailed steps for each method.
Detailed Steps for Each Method
CNC Machine
- Set Up: Install the CAD program and establish the X, Y, and Z axes.
- Load Material: Secure the 80% lower receiver in the machine.
- Run Program: Start the CNC program to begin milling.
- Monitor: Keep an eye on the process to ensure everything goes smoothly.
- Finish: Remove the lower receiver and inspect for precision.
Milling Machine
- Secure Lower: Clamp your 80% lower receiver securely in the vise.
- Set Depth: Adjust the milling machine to the required depth.
- Mill: Begin milling the specified areas, following detailed instructions.
- Check Work: Frequently check your progress to ensure accuracy.
- Finish: Clean up any rough edges and inspect your work.
Drill Press
- Mount Lower: Secure the lower receiver in a vise or clamp.
- Set Depth: Adjust the drill press to the required depths.
- Drill Holes: Drill the necessary holes for the trigger pins and safety selector.
- Mill Pocket: Use end mills to create the trigger pocket.
- Inspect: Check your work for accuracy and finish any rough edges.
Router
- Secure Lower: Clamp the lower receiver securely.
- Attach Jig: Use a jig to guide your router.
- Rout Pocket: Rout out the trigger pocket, following the jig’s guide.
- Drill Holes: Drill the necessary holes for the pins and selector.
- Finish: Inspect and clean up any rough edges.
Hand Drill
- Attach Jig: Secure the jig to the lower receiver.
- Drill Holes: Carefully drill the necessary holes using the jig as a guide.
- Mill Pocket: Use a hand-held end mill to create the trigger pocket.
- Inspect: Check your work frequently to ensure accuracy.
- Finish: Clean up any rough edges and inspect your work.
By following these steps and choosing the method that best suits your tools and skills, you can successfully finish your 80% AR-15 lower receiver. Next, we’ll discuss common mistakes and how to avoid them.
Common Mistakes and How to Avoid Them
When learning how to finish an 80% AR-15 lower receiver, it’s important to be aware of common mistakes. Avoiding these pitfalls can save you time, money, and frustration.
Measurement Errors
Problem: One of the most frequent mistakes is inaccurate measurements. This can lead to misaligned parts or improper fitting of components.
How to Avoid:
– Double-Check Measurements: Use calipers and rulers to measure twice before you cut.
– Follow Detailed Guides: Use comprehensive guides and videos. Bob Boyd’s series on assembling AR-15 parts is a great resource for beginners.
– Mark Clearly: Clearly mark your measurements on the receiver before drilling or milling.
Improper Tool Use
Problem: Using the wrong tools or using tools improperly can damage your lower receiver and compromise its functionality.
How to Avoid:
– Use the Right Tools: Invest in the recommended tools like a milling machine, drill press, or router. Using a jig can also help guide your drilling and milling.
– Learn Tool Basics: Spend some time learning how to properly use each tool. Milling machines and CNC machines require a learning curve, but basics can be learned quickly.
– Secure Your Work: Always use a vise and clamps to secure your lower receiver. This prevents it from moving and ensures precision.
Inadequate Finishing
Problem: Skipping the finishing steps can leave rough edges and burrs, impacting the performance and safety of your AR-15.
How to Avoid:
– Deburr and Clean: After milling and drilling, always deburr and clean your lower receiver. This removes sharp edges and metal shavings.
– Inspect Thoroughly: Inspect your work carefully for any imperfections. A well-finished receiver should look and function like a factory-made unit.
– Consider Anodizing: If your receiver is not anodized, consider getting it done. Anodizing adds a protective layer that increases durability and corrosion resistance.
By being mindful of these common mistakes and following these tips, you’ll be well on your way to successfully completing your 80% lower receiver. Next, we’ll cover the finishing touches and post-completion steps to ensure your AR-15 lower receiver is ready for assembly.
Finishing Touches and Post-Completion Steps
Now that you’ve completed the milling or drilling of your 80% lower receiver, it’s time to focus on the finishing touches. These steps are crucial for ensuring your lower receiver is functional, durable, and ready for assembly.
Deburring
Deburring is the process of removing sharp edges and burrs left from machining. This step is essential to prevent injury and ensure smooth operation of moving parts.
- Use a Deburring Tool or File: Carefully run the tool along all cut edges to remove any sharp burrs.
- Check Inside the Trigger Pocket: Ensure there are no burrs that could interfere with the fire control group.
- Smooth Out the Pin Holes: Run a small round file through the newly drilled holes to ensure they are clean and smooth.
Cleaning
Cleaning the lower receiver is vital to remove any metal shavings and debris that could cause malfunctions.
- Blow Out the Shavings: Use compressed air to blow away any loose metal shavings.
- Wipe Down the Receiver: Use a cloth and a solvent to thoroughly clean all surfaces.
- Inspect for Residue: Ensure no debris is left, especially in the trigger pocket and pin holes.
Anodizing
Anodizing is an optional but highly recommended step. It adds a protective layer to the aluminum, increasing its durability and resistance to corrosion.
- Choose a Professional Service: While DIY anodizing kits are available, professional services ensure a high-quality finish.
- Consider Your Options: You can choose clear anodizing for a natural look or colored anodizing for a custom appearance.
Assembly
With your lower receiver now deburred, cleaned, and possibly anodized, it’s time for the final step: assembly.
- Install the Fire Control Group: Begin by inserting the trigger, hammer, and related pins. Ensure they move freely and operate correctly.
- Attach the Buffer Tube: Screw in the buffer tube, ensuring it is securely fastened.
- Fit the Upper Receiver: Attach the upper receiver to the lower, making sure the takedown pins align and lock in place.
- Test the Functionality: Check the functionality of the safety selector, trigger, and hammer. Make sure everything operates smoothly.
By following these finishing touches and post-completion steps, your 80% lower receiver will be ready for assembly and use. Next, we’ll dive into some frequently asked questions to address any lingering concerns.
Frequently Asked Questions about Finishing an 80% Lower Receiver
What is the benefit of an 80% lower?
One of the main benefits of an 80% lower receiver is the privacy it offers. Since it is not considered a firearm by the ATF, you can purchase one without a background check or FFL paperwork. This allows you to build your firearm discreetly.
Another advantage is cost savings. By buying an unfinished receiver, you avoid the “brand tax” and additional fees that come with purchasing a completed firearm. This makes your custom build more affordable.
Finally, an 80% lower gives you complete control over your build. You can choose every part, from the trigger to the grip, and add personal touches like custom logos and finishes. This ensures your firearm is unique and tailored to your preferences.
What is the difference between 80 percent and stripped lower receivers?
An 80% lower receiver is a partially completed lower that requires additional machining to become functional. It lacks the final milling and drilling needed to install the fire control group and other components.
A stripped lower receiver, on the other hand, is fully machined and ready to be assembled with other parts. It is considered a firearm by the ATF and requires a background check and FFL paperwork to purchase.
In summary, an 80% lower offers more privacy and customization options, while a stripped lower is ready for immediate assembly but comes with more regulatory requirements.
Are 80% lowers legal in DE?
The legality of 80% lowers varies by state. While the ATF does not consider them firearms, some states have specific regulations.
In Delaware, 80% lowers are currently legal. However, stay updated on local laws, as regulations can change. Always consult state and local laws to ensure you are compliant before purchasing or completing an 80% lower receiver.
In the next section, we’ll explore common mistakes to avoid and tips for a smooth build.
Conclusion
Completing an 80% AR-15 lower receiver can be a rewarding project that offers a sense of accomplishment and a deeper understanding of your firearm. While it may not save you money, the experience and satisfaction of building your own rifle are invaluable.
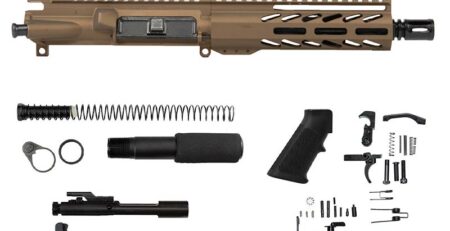
Daytona Tactical: Your Trusted Partner
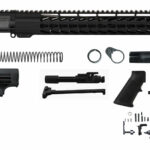
At Daytona Tactical, we offer everything you need to get started with your 80% lower receiver project. Our range of high-quality products, including AR-15 lower and upper sets, ensures you have reliable components for your build.
Explore our selection here to find the perfect parts for your next project.
Project Satisfaction
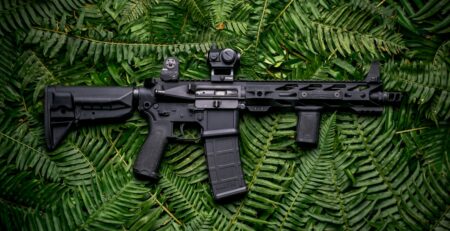
Many enthusiasts take on this project for the sheer joy of creating something with their own hands. Whether you’re using a CNC machine, milling machine, drill press, or router, the process of finishing an 80% lower receiver is a rewarding journey that enhances your skills and gives you a custom-built firearm to be proud of.
Further Resources
If you’re looking for more information, detailed guides, or specific tools, check out our blog and video tutorials. We cover everything from the basics to advanced techniques, ensuring you have all the knowledge you need for a successful build.
Always follow safety protocols and stay updated on local laws. Happy building!
Thank you for choosing Daytona Tactical for your firearm needs. We look forward to supporting you in all your future projects.